Do you cringe every time you open the cabinet under your kitchen sink, only to be met with a chaotic jumble of cleaning supplies, sponges, and various odds and ends? You’re not alone. This often-neglected space quickly becomes a black hole of clutter, making it hard to find what you need, when you need it. But what if you could transform that messy cavern into a perfectly organized, highly efficient hub for your cleaning tools? With a few smart DIY strategies and clever storage solutions, you can conquer the under-sink chaos and reclaim valuable space. This guide will walk you through everything you need to know to organize your under-sink cleaning tools, making your home cleaning routine smoother and more enjoyable.
What is Under-Sink Organization and Why Do You Need It?
Under-sink organization is the process of transforming the often-neglected cabinet beneath your kitchen or bathroom sink into a functional, accessible, and tidy storage area specifically designed for cleaning supplies and other household essentials. It goes beyond simply stacking items, focusing instead on creating a system where every item has its place and is easy to retrieve. This structured approach to storage is crucial for several reasons.
Without proper organization, your under-sink cabinet can quickly become a source of frustration. Common problems include lost items, difficulty accessing products, potential spills leading to water damage or mold, unpleasant odors from damp cloths, and the frequent purchase of duplicate items because you can’t find what you already own. An organized under-sink area saves you time by making cleaning tasks more efficient, reduces stress by eliminating visual clutter, and helps extend the life of your products by storing them correctly. Ultimately, it contributes to a more harmonious and hygienic home environment.
Popular Under-Sink Organization Methods and Tools
Taming the under-sink beast requires a variety of strategies and tools, each designed to address specific storage challenges. Many of these solutions can be implemented with DIY ingenuity or affordable store-bought items.
Classification by Type:
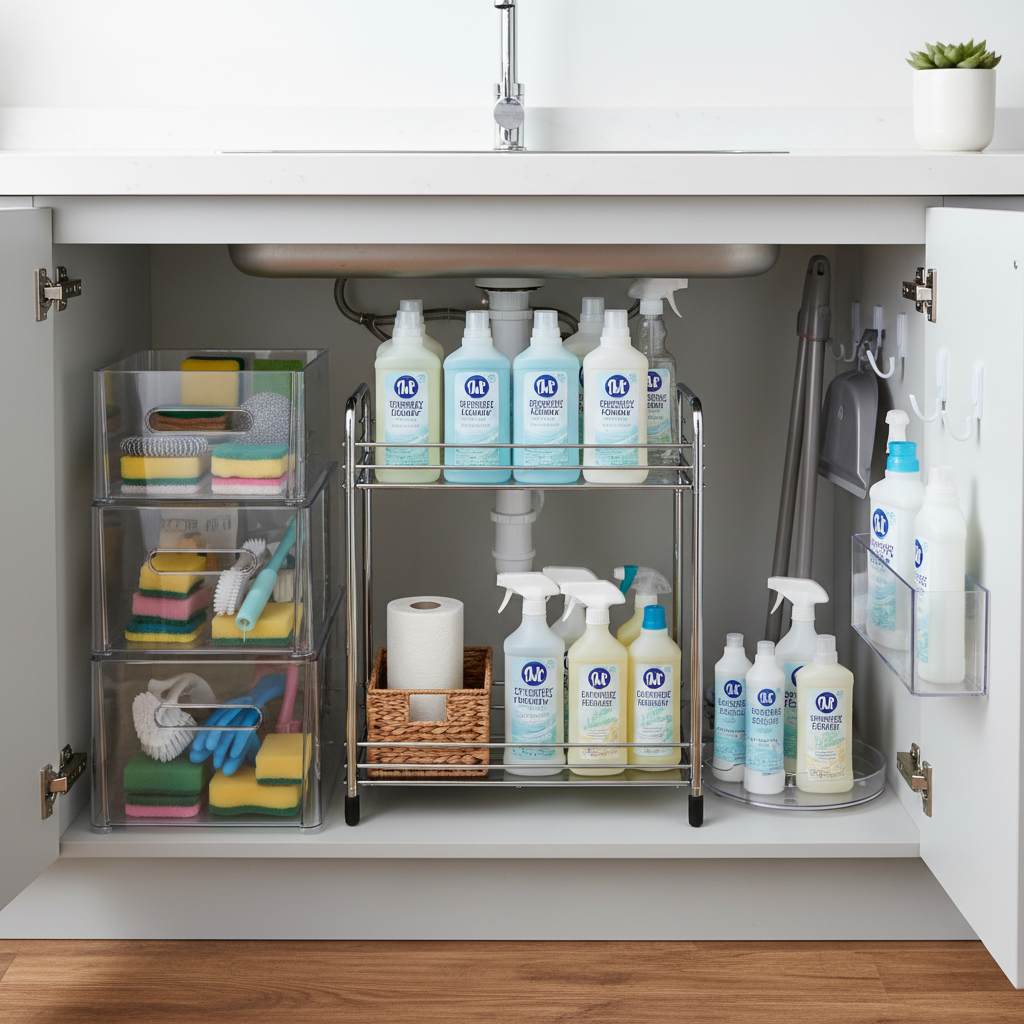
- Bins and Baskets: These are fundamental for grouping similar items and containing spills. Use them to collect sponges, scrubbing brushes, dish soap refills, or cleaning cloths. Clear bins are particularly useful as they allow you to see the contents at a glance.
- Tiered Organizers/Shelves: These vertical solutions are excellent for maximizing the height within your cabinet, especially around pipes. Many come with pull-out drawers, making it easier to access items stored further back.
- Lazy Susans (Turntables): Ideal for deep cabinets or navigating around tricky plumbing, a lazy Susan allows you to spin items 360 degrees, bringing even the furthest bottles within easy reach. They are perfect for grouping multiple spray bottles or smaller cleaning product containers.
- Tension Rods: A simple yet ingenious DIY hack, tension rods can be installed across the width of your cabinet to hang spray bottles by their nozzles. This frees up the cabinet floor for other items and makes spray bottles easily accessible. They can also be used to hang cleaning gloves or small cloths.
- Over-the-Door Organizers: Don’t let your cabinet doors go to waste! These organizers feature shallow bins or pockets that attach to the inside of the door, perfect for storing smaller, lighter items like sponges, scrub pads, or even rolls of trash bags and paper towels.
- Portable Caddies: A portable cleaning caddy is a game-changer for cleaning multiple rooms. Fill it with your essential, most-used cleaning products, and you can easily grab and go, taking your supplies wherever they’re needed without multiple trips.
Classification by Material (with a DIY focus):
- Plastic: Widely available and affordable, plastic bins, caddies, and tiered shelves are popular for their durability and ease of cleaning. They are also excellent for containing potential spills.
- Metal: Wire or chrome tiered shelves and tension rods offer sturdy, long-lasting storage. Look for rust-resistant finishes to protect against moisture.
- Repurposed Items: For budget-friendly DIY options, consider using sturdy cardboard boxes (you can line them with contact paper for water resistance), old plastic food containers for small items like dishwasher pods, or even cleaned-out milk cartons for sponges and small brushes.
- Wood: For those with basic DIY skills, a simple wooden caddy can be built to size, offering a robust and aesthetically pleasing solution.
Each solution has its strengths. Bins keep things together, tiered shelves tackle vertical space, lazy Susans solve deep cabinet dilemmas, and tension rods make spray bottles a breeze. Combining these various methods will create a highly customized and effective organization system under your sink.
Essential Criteria for Choosing or Creating Your Under-Sink Organization System
Before diving into purchasing or building your organizing solutions, a thoughtful assessment of your space and needs is paramount. The goal is to create a system that not only looks good but genuinely works for your household.
Space Assessment:
The under-sink cabinet is notoriously challenging due to plumbing.
- Measure Dimensions: Accurately measure the height, width, and depth of your cabinet. Crucially, measure around pipes, the garbage disposal, and any other fixed obstacles. This will prevent you from buying organizers that don’t fit.
- Account for Obstacles: Identify where pipes, water filters, or the garbage disposal unit are located. Many organizers are designed with cut-outs or adjustable features to accommodate these, so knowing their exact position is key.
|
Our Picks for the Best Bottle brush in 2026
As an Amazon Associate I earn from qualifying purchases.
|
||
| Num | Product | Action |
|---|---|---|
| 1 | OXO Tot Bottle Brush with Stand, Baby Bottle Brush |

|
| 2 | ROSEOK 2 in 1 Long Handle Bottle Brush with Straw Brush for Cleaning Glass, Sports Bottle, Coffee Mug,Navy Blue,1 Pack |
|
| 3 | Holikme Bottle Brush Tube Cleaning Lab Set with Long Handle, Cup Cleaner for Washing Narrow Neck Beer Wine Decanter Pipes Lids Sinks Cap Covers, White |
|
| 4 | Amazon Brand - Mama Bear Baby Bottle Brush with Nipple Cleaner and Suction Cup Stand, White (Pack of 3) |
|
| 5 | Holikme 6 Pack Bottle Brush Set, 14" Long Handle Stainless Steel Bottle Cleaner Brush, 3 Straw Brushes, 3-in-1 Bottle Cleaning Brush for Water Bottle, Antistatic Lab Brushes, Straws Black |
|
| 6 | Momcozy Bottle Brush Kit with Push-Press Foam Design - Newborn Essentials Gift, Portable Cleaning Tool for Home & Travel, Baby Bottle Cleaner Brush for Breast Pumps & Nipples, Green |
|
| 7 | MR.SIGA Long Handle Bottle Brush, Flexible Scrub Brush for Water Bottles, Glasswares, Mugs, Black, 2 Pack |
|
| 8 | Scotch-Brite Glass and Water Bottle Brush, Long-Lasting, Safe on Glassware, Shaker Bottles, Food Processors, & More, Non-slip handle, Durable, Reusable, Clean in Top Rack of Your Dishwasher |
|
| 9 | Munchkin Sponge Bottle Brush, Grey/Sage, 2 Count (Pack of 1) |
|
| 10 | ALINK 16 inch Long Bottle Brush Cleaner for Washing Wine/Beer/Sport Well/Thermos/Glass, Hummingbird Feeder and Long Narrow Neck Sport Bottles |
|
Item Categorization:
Understanding what you need to store is as important as knowing where.
- Declutter First: Before you organize, you must declutter. Remove everything from under the sink. Discard expired products, empty containers, and anything you no longer use. Consolidate duplicates to free up space. This step often reveals how much less you actually need to store.
- Group Like Items: Categorize the remaining items. Common groupings include dishwashing essentials (soap, sponges, dishwasher pods), general surface cleaners (all-purpose spray, glass cleaner, microfiber cloths), and utility items (trash bags, rubber gloves). This makes finding specific items much quicker.
Material and Durability:
The under-sink area can be prone to moisture and spills, making material choice important.
- Waterproof/Spill-resistant: Opt for materials that can withstand moisture. Plastic bins, metal organizers with rust-resistant coatings, or even DIY solutions lined with waterproof contact paper are ideal. This protects your cabinet base from leaks or drips.
- Sturdy Construction: Cleaning supplies, especially large bottles of detergent, can be heavy. Choose organizers that are robust enough to hold the weight without sagging or breaking.
- Easy to Clean: Select materials that can be easily wiped down. This ensures that your organized space remains hygienic and presentable.
Accessibility:
An organized space is only effective if you can easily get to what you need.
- Ease of Access: Consider how often you use each item. Frequently used items should be front and center or in easily accessible pull-out drawers or lazy Susans. Less frequently used items can be stored further back or on higher shelves.
- Visibility: Clear containers or open baskets can significantly improve visibility, allowing you to see your inventory at a glance and avoid over-purchasing.
By meticulously planning based on these criteria, you lay the groundwork for an under-sink organization system that is both practical and sustainable.
Comparing Popular Under-Sink Organization Solutions
Choosing the right combination of tools can make all the difference. Here’s a comparison of common under-sink organization solutions to help you decide what fits best for your space and cleaning routine.
| Solution Type | Material (Common) | Key Features | Pros | Cons | Best For |
|---|---|---|---|---|---|
| Baskets/Bins | Plastic, Fabric | Grouping, containment of items | Simple, affordable, versatile, contains spills | Can be hard to reach back items, no vertical use | Small items, grouping cleaning product categories |
| Tiered Shelves | Metal, Plastic | Vertical expansion, often with pull-out drawers | Maximizes vertical space, easy access to multiple levels | Can be bulky, pipes can be an obstacle, less flexible | Varied item sizes, maximizing cabinet height |
| Lazy Susans | Plastic, Metal | Rotates 360 degrees for full access | Excellent for deep cabinets, navigates around pipes | Limited height for taller bottles, can be unstable | Bottles, jars, frequently accessed items, corners |
| Tension Rods | Metal | Adjustable, hangs items by nozzles | Utilizes dead space, DIY-friendly, frees up floor | Limited to hanging spray bottles/cloths, weight limit | Spray bottles, cleaning gloves, small cloths |
| Door Organizers | Metal, Plastic | Attaches to cabinet door, shallow bins | Uses often-ignored space, quick access to small items | Limited weight capacity, can block cabinet opening | Sponges, small brushes, paper towels, trash bags rolls |
| Portable Caddies | Plastic, Wood | Handle for transport, multiple compartments | Grab-and-go cleaning, keeps tools together for mobility | Takes up floor space, needs to be refilled, can be bulky | Whole-house cleaning, frequently used, varied tools |
DIY Guide: Steps to Organize Your Under-Sink Area Effectively
Transforming your under-sink cabinet from a chaotic mess to an organized haven is a rewarding DIY project. Follow these steps for a systematic approach.
Step 1: Empty and Declutter
This is the most crucial first step.
- Remove Everything: Take every single item out of the cabinet. This gives you a clear view of the space and allows for a fresh start.
- Discard and Consolidate: Go through each item. Throw away expired products, empty bottles, or anything that is broken or no longer used. Consolidate any duplicate items into a single container if possible to save space. If you have extra supplies, consider moving them to a less frequently accessed storage area, like a pantry or laundry room cabinet.
Step 2: Clean and Prepare the Space
Now that the cabinet is empty, it’s time to make it pristine.
- Deep Clean: Wipe down the interior of the cabinet thoroughly, removing any dust, grime, or lingering spills. A multi-purpose cleaner works well here.
- Add a Shelf Liner: Consider lining the cabinet base with a waterproof, non-slip shelf liner. This protects the cabinet from future spills and makes cleaning easier. It also prevents items from sliding around.
Step 3: Categorize and Plan Your Layout
With a clean slate, you can now strategize your new system.
- Group Remaining Items: Put like items together on your counter or floor. This might include a pile for dish soaps and sponges, another for general surface cleaners, and one for trash bags or specialty tools.
- Consider Frequency of Use: Place items you use daily or weekly (like dish soap) in the most accessible spots. Less frequently used items can go towards the back or on higher shelves.
- Sketch a Layout: Before placing anything back, roughly sketch out where you plan to put your categorized groups, keeping pipes and other fixed obstacles in mind. This helps visualize the best use of space.
Step 4: Implement DIY and Store-Bought Solutions
This is where your chosen organizers come into play.
- Bins and Baskets: Place your grouped items into appropriate bins or baskets. Use clear containers for small items like dishwasher pods or spare sponges to maintain visibility.
- Tension Rods: Install a tension rod near the top front or back of the cabinet to hang spray bottles. Ensure it’s sturdy enough to hold the weight.
- Hooks: Attach adhesive hooks to the inside walls of the cabinet or the cabinet doors for hanging rubber gloves, scrub brushes with loops, or microfiber cloths.
- Tiered Shelves or Lazy Susans: Position these around your plumbing, utilizing the vertical space or making deep areas accessible. Adjustable tiered shelves are particularly good for working around pipes.
- DIY Caddy Example: For a simple DIY cleaning caddy, you can repurpose a sturdy cardboard box or a plastic bin. For a more robust solution, a basic wooden caddy can be built from scrap plywood. Measure your tallest bottles and width/length to ensure everything fits snugly. This allows you to carry essential cleaning supplies throughout your home.
Step 5: Label Everything
The final touch for long-term organization.
- Clear Labels: Apply clear labels to all bins, containers, and shelves. This ensures that every item has a designated home, making it easy for anyone in the household to find and return items to their correct spot. Labeling helps maintain the system and prevents new clutter from forming.
“A well-organized under-sink area isn’t just about tidiness; it’s about creating a functional workspace that supports your daily cleaning habits. The secret lies in decluttering rigorously and then choosing adaptable solutions that work around your unique plumbing.” – Admin, reviewmht.com
Where to Find Organizing Supplies: Top Picks and DIY Inspiration
Finding the right tools for your under-sink organization project doesn’t have to be expensive or complicated. A blend of store-bought and DIY items often yields the best results.
Retailers for Store-Bought Solutions:
- Home Goods Stores: Stores like IKEA, The Container Store, or Bed Bath & Beyond offer a wide array of specialized under-sink organizers, from tiered pull-out drawers to adjustable shelves.
- Discount Stores: Retailers such as Dollar Tree, Target, or Walmart are excellent sources for affordable plastic bins, baskets, and basic caddies.
- Online Marketplaces: Amazon, Etsy, and other online platforms provide endless options, often with customer reviews that can guide your choices. Look for terms like “under sink organizer,” “cabinet caddy,” or “expandable shelf.”
DIY Materials and Inspiration:
Many effective solutions can be created or adapted from items you already own or can acquire cheaply.
- Repurposed Household Items:
- Shoeboxes or Sturdy Cardboard Boxes: Excellent for creating custom-sized dividers within larger bins or for containing small, categorized items. Line them with contact paper for a cleaner look and moisture resistance.
- Plastic Food Containers: Clear plastic containers (like those from takeout or food storage sets) are perfect for storing dishwasher pods, sponges, or small brushes. Their transparency helps you see contents easily.
- Milk Jugs or Detergent Bottles: Cleaned and cut, these can serve as makeshift scoops, funnels, or even small, temporary bins for damp items like used sponges (allowing them to air dry).
- Hardware Store Essentials:
- Tension Rods: Inexpensive and versatile, tension rods are available in various lengths and can be used to hang spray bottles or lightweight cloths.
- Adhesive Hooks: Command hooks or similar adhesive hooks can be used on cabinet doors or inner walls to hang gloves, scrub brushes, or small dustpans.
- Shelf Liner: Look for durable, waterproof, non-adhesive shelf liner to protect your cabinet base.
When considering DIY, prioritize functionality and durability. A simple wooden caddy can be built using basic carpentry tools and scrap wood, offering a custom fit and robust storage for heavier items. The key is to think creatively about how everyday items can be repurposed to solve your specific under-sink storage challenges.
Expert Buying Guide: Tips for a Lasting Organization System
As an experienced technician in home organization, I’ve seen countless under-sink spaces, from the perfectly structured to the utterly chaotic. Here are my expert tips to ensure your under-sink organization isn’t just a temporary fix, but a lasting solution.
First, prioritize functionality over aesthetics initially. While a visually pleasing setup is a bonus, the primary goal is efficiency. Choose solutions that genuinely solve your storage problems and make daily tasks easier, even if they’re not the trendiest options.
Next, invest in quality pieces for frequently accessed items. For organizers that hold heavy bottles or are pulled out daily, durability is key. A sturdy metal tiered shelf or a robust plastic caddy will withstand daily use much better than flimsy alternatives, saving you money and frustration in the long run.
Consider custom or adjustable solutions for unique spaces. Every under-sink cabinet is different, especially with varying pipe configurations. Look for expandable shelves, U-shaped organizers that fit around plumbing, or modular bins that can be rearranged. Don’t force a standard solution into a non-standard space.
“Don’t be afraid to experiment with different organizing solutions until you find what truly works for your unique space and cleaning habits. The best system is one you can easily maintain, not just install.” – Admin, reviewmht.com
Finally, remember to periodically review and adjust your system. Life changes, and so do your cleaning needs. Every few months, take a quick inventory. Do you still use everything? Is anything broken? Could something be more efficient? A quick refresh ensures your under-sink organization remains optimal and prevents clutter from creeping back in. By following these guidelines, you’ll create a system that not only organizes your cleaning tools but also simplifies your entire home maintenance routine.
Conclusion
A well-organized under-sink area can dramatically improve your home’s functionality, transforming a previously chaotic space into a model of efficiency. By systematically decluttering, cleaning, and implementing smart storage solutions, you unlock valuable space and streamline your cleaning routine. From utilizing vertical storage with tiered shelves to making the most of cabinet doors with hooks, and embracing the power of portable caddies, the strategies outlined here empower you to create a personalized system that caters to your specific needs. Remember, a tidy under-sink cabinet not only looks good but also saves you time, reduces stress, and prevents the endless cycle of misplaced items and duplicate purchases. Ready to transform your under-sink space? Start with these DIY organization strategies today and enjoy a cleaner, more efficient home.
What DIY under-sink organization hack has worked best for you?
Frequently Asked Questions
How do I deal with the pipes under my sink when organizing?
Dealing with pipes is a common challenge. Use U-shaped or adjustable tiered shelves that are specifically designed to fit around plumbing. Lazy Susans are also excellent for navigating around pipes, allowing easy rotation to access items stored behind them without obstruction.
What are some budget-friendly DIY ideas for under-sink organization?
For budget-friendly solutions, repurpose sturdy shoeboxes or plastic food containers as bins. Line cardboard with contact paper for moisture resistance. A tension rod can be used to hang spray bottles or cleaning cloths, and adhesive hooks can utilize cabinet door space for sponges or gloves, offering practical storage without significant cost.
How often should I declutter and reorganize under my kitchen sink?
Aim for a thorough declutter and reorganization every 3-6 months. However, consistent daily or weekly maintenance—like promptly returning items to their designated spots after use—is crucial to prevent major overhauls and keep the space continuously tidy.
Can I store anything under the sink?
While convenient, it’s best to store cleaning supplies, dishwashing essentials, and trash bags under the sink. Avoid storing food items, flammable materials, or anything sensitive to temperature fluctuations or potential leaks, as these conditions can compromise their safety or effectiveness.
What’s the easiest way to keep spray bottles organized?
The easiest way to organize spray bottles is by installing a tension rod across the cabinet’s width. You can hang the bottles by their trigger nozzles, which keeps them upright, prevents leaks, and frees up valuable floor space. This method makes them easily accessible and prevents tipping.